RoamSafe Agent for macOS
This guide will assist with the process of installing, configuring, and managing the RoamSafe Agent on macOS devices. It assumes you have an active RoamSafe Agent license and the necessary permissions to complete these tasks.
Versioning (macOS)
New versions of the RoamSafe Agent for macOS are periodically released to improve functionality, accommodate updates in the Apple macOS operating system, or address technical issues. These updates can be implemented independently of the CyberEdge firmware version in certain situations.
RoamSafe Agent Installation
Outlined below is the process for manually installing the RoamSafe Agent. For large-scale deployments, it's advisable to use Jamf PRO or similar device management tools. To install the RoamSafe agent on macOS, begin by downloading the installer. Navigate to RoamSafe > Agents and download the macOS version of the RoamSafe agent.
- Run the RoamSafe-installer.pkg and click “Continue”.
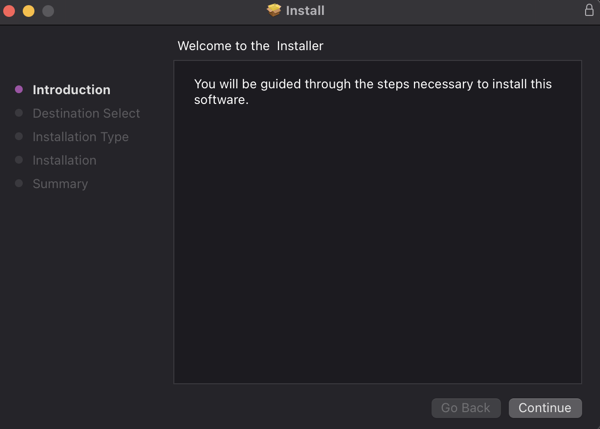
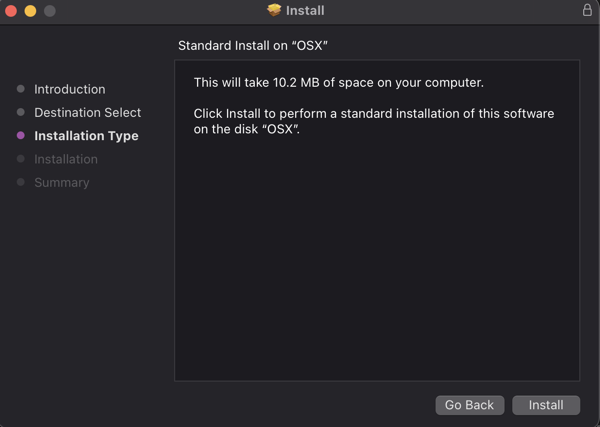
- Click "Install"
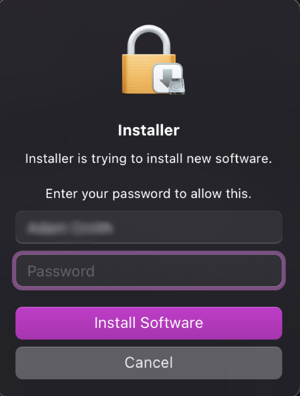
- Provide your system credentials and click “Install Software”
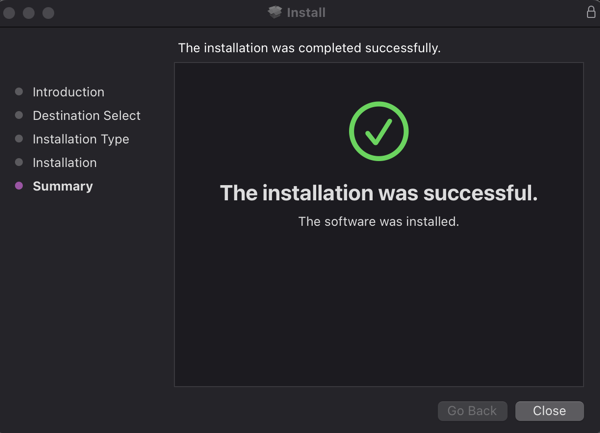
- The RoamSafe Agent should now install successfully.
Allow RoamSafe Application Extensions
The macOS operating system requires user approval before Content filtering and System extensions can be loaded. To approve the RoamSafe Agent extensions on macOS go to System Settings > Privacy and Security.
- In the security section, find the RoamSafe application and click "Allow"
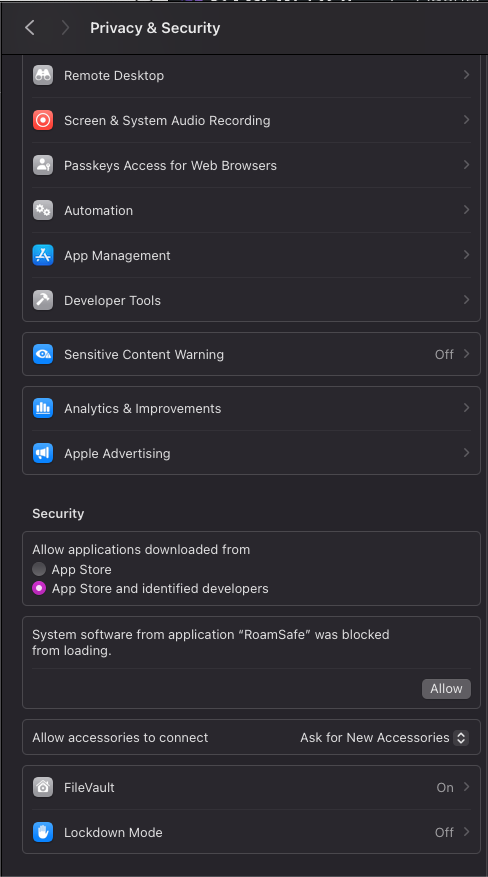
- Provide your credentials and click “Install Software”

This process needs to be completed twice. The first run will load Content Filtering, and the second run will enable System Extensions. After installation and approval of the system extensions, the user must authenticate with the RoamSafe Agent.
Agent Authentication
To authenticate a user with the RoamSafe Agent complete the following steps;
- Go to the RoamSafe Agent icon in the top menu to open the configuration.
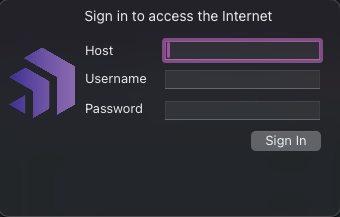
Add the following details; - Host: The service ID of the CyberEdge. The service ID can be found on the CyberEdge dashboard under Licensing information - Username: The username of the user - Password: The password of the user
Once completed, the RoamSafe agent will authenticate and update its configured Access Policies. To identify an authenticated device in CyberEdge, go to Status > Agents. Authenticated devices should be listed there.
To view live logs for authentication sessions and Access Policy exchanges, navigate to Status > Log Viewer > RoamSafe Agent and filter using the Unique ID provided in Status > Agents.
    2024-06-25 10:57:46.627: INFO Attempting login for agent 2B11CD8B-337D-42B8-84E3-A23D3A7013E5 (user 'User'; host 'HostName')
    2024-06-25 10:57:47.975: INFO Authenticated agent 2B11CD8B-337D-42B8-84E3-A23D3A7013E5 (user 'User'; host 'HostName')
    2024-06-25 10:57:48.076: INFO Login succeeded for agent 2B11CD8B-337D-42B8-84E3-A23D3A7013E5 (user 'User'; host 'HostName') (User Name)
    2024-06-25 10:57:52.359: INFO Agent 2B11CD8B-337D-42B8-84E3-A23D3A7013E5 is requesting new policy set.
    2024-06-25 10:57:52.380: INFO Policies provided to agent 2B11CD8B-337D-42B8-84E3-A23D3A7013E5 successfully.
Successful logins from the RoamSafe Agent and Access Policy updates should be visible.
Agent Updates
RoamSafe Agent updates for macOS can be completed using one of automatic updates, Jamf Pro deployed application updates, or manual updates. Enabling automatic updates is strongly recommended to ensure the RoamSafe Agent remains up to date with the latest version changes. The following guide explains the methods for updating the RoamSafe Agent for macOS.
Automatic Updates
System Administrators can configure automatic updates to streamline the distribution of RoamSafe Agent version updates to devices. When enabled, the device agent will detect a version update during its check-in process and automatically download and install it.
Depending on your organizational requirements, automatic updates can be set to disabled, allowing administrators to manually test new agent versions before deploying to all devices. For more information, see the section on manual updates.
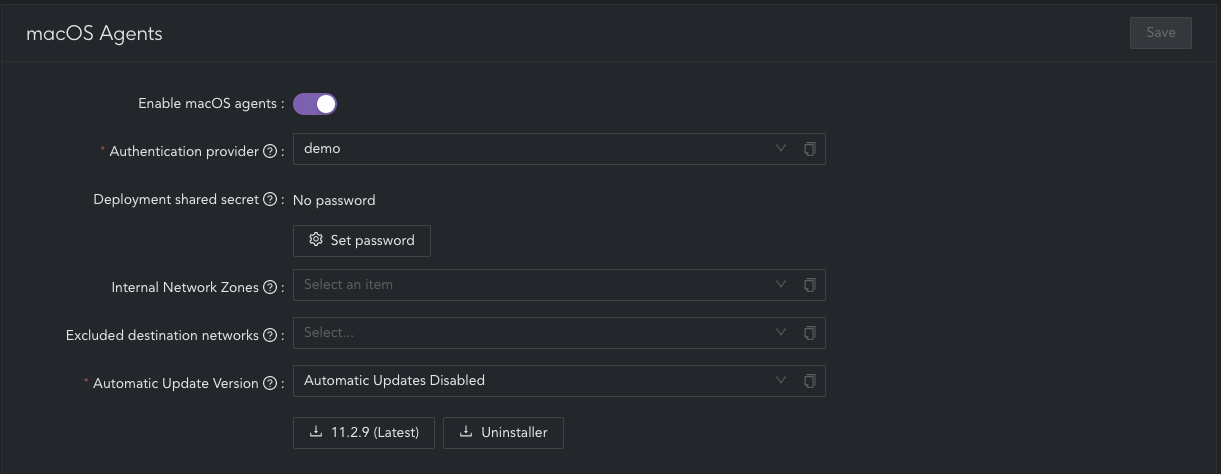
To configure automatic updates navigate to;
- RoamSafe > Agents > Automatic Update Version
- In Automated Update Version select "Automatic Updates Disabled" or "Update version" (depending on your organizational requirements)
- Click "Save" and apply changes
Update using Jamf Pro
System Administrators may choose to deploy updated versions of the RoamSafe Agent application for macOS via Jamf Pro to align with standard application deployment procedures. When using Jamf Pro for updates, it is recommended to disable automatic updates. To disable automatic updates, navigate to:
- RoamSafe > Agents > Automatic Update Version
- Set to "Automatic Updates Disabled"
- Click "Save" and apply changes
To deploy the RoamSafe Agent via Jamf Pro, first download the latest version by navigating to RoamSafe > Agents > Download Version (latest). For detailed instructions on deploying via Jamf Pro, please refer to the RoamSafe macOS Jamf Integration guide.
Manual Update
If automatic updates or Jamf Pro deployment methods are not available, a manual update can be performed. To manually update the RoamSafe Agent, download the required version by navigating to RoamSafe > Agents > Download (latest). After downloading, copy the RoamSafe Agent to the Applications folder on the macOS device and follow the prompts to complete the update.
This method is commonly used to test new agent versions before enabling automatic updates for wider distribution.
Important note
Manually Updating the application using this method will require the user to reauthenticate
Uninstall Agent
To remove the RoamSafe agent, you must use the RoamSafe uninstall scripts for macOS. To download the uninstaller navigate to:
- RoamSafe > Agents > Download Uninstaller
- From the terminal, go to the directory containing the roamsafe-uninstaller.sh file
- Run the following:
Commands
chmod +x roamsafe-uninstaller.sh
./roamsafe-uninstaller.sh
The RoamSafe agent will be removed for the macOS device.
RoamSafe macOS Jamf Integration
This help article details instructions for deploying the RoamSafe Agent for macOS via Jamf. It is assumed that the reader has familiarity with configuring Jamf, and that they have access to a configured environment. Specifically, this guide requires but does not detail how to set up:
- Apple Push Certificate: Required to deploy MDM profiles
- File Share Distribution Point: A SMB server to distribute the Installer Package
- LDAP Authentication: In our testing Jamf did not support querying locally created user assignment
- User assignment: This should happen out-of-the-box during Enrollment
- HTTPS Inspection certificate deployment: The Agent relies on HTTPS communication with the CyberEdge Appliance for authentication, policy update and reporting
Jamf Deployment Script
The following script can be used to deploy the RoamSafe Agent.
#!/bin/bash

##############################################################################
# RoamSafe v11 Jamf pre-Install Script
# (c) CyberEdge. Last modified 1st October 2021
##############################################################################

# Log everything to disk as well as the Jamf console, for debugging
logfile=/var/log/jamf.log
scriptname="roamsafe-setup"
# Prepend the Jamf log format to all output from this script
exec &> >(/usr/bin/awk "{\"date +\\\"%a %b %d %X\\\"\" | getline date; close \"date +\\\"%a %b %d %X\\\"\"; print date, \"`scutil --get ComputerName`\", \"$scriptname\[$$\]:\", \$0}" | /usr/bin/tee -a "$logfile")

# Loop through deleting keychain entries, with infinite recursion protection.
# This will in effect log the user out, as well as clearing any previous config
set -o pipefail
i="0"
while security delete-generic-password -s com.cyberhound.RoamSafe 2>/dev/null | awk 'BEGIN{FS="="}/acct/{print "Deleted keychain entry", $2}'; do
i=$[$i+1]
if ( [ $i -gt 6 ] ); then
    break
fi
done

echo "Creating magical User Preferences file..."
# When testing on macOS 11.6, `defaults` will write somewhere that NSUserDefaults can't read if this file doesn't already exist.
mkdir -p /var/root/Library/Containers/com.cyberhound.RoamSafe.RoamSafeAppProxy/Data/Library/Preferences/
touch /var/root/Library/Containers/com.cyberhound.RoamSafe.RoamSafeAppProxy/Data/Library/Preferences/com.cyberhound.RoamSafe.RoamSafeAppProxy.plist

echo "Writing sitekey '$4'"
defaults write com.cyberhound.RoamSafe.RoamSafeAppProxy secret-sitekey "$4"

SERIAL=$(ioreg -c IOPlatformExpertDevice -d 2 | awk -F\" '/IOPlatformSerialNumber/{print $(NF-1)}')

if [[ -z $6 || -z $7 ]]; then
echo "No JSS credentials found."
echo "Assuming '$3' is the correct username for device with serial $SERIAL"
ASSIGNED_USERNAME=$3
else
# Use the Jamf API to get the assigned user.
JSS_URL=$(defaults read /Library/Preferences/com.jamfsoftware.jamf.plist jss_url)
echo "JSS credentials found. Connecting to $JSS_URL ..."
TOKEN=$(curl -s -u "$6":"$7" -X POST "$JSS_URL/api/v1/auth/token" | /usr/bin/plutil -extract token raw -)
# Alert the administrator if there's been an error getting the username
if [[ -z "$TOKEN" ]]; then
    TOKEN=$(curl -s -u "$6":"$7" -X POST "$JSS_URL/uapi/auth/tokens" | awk '/token/{print substr($3, 2, length($3) - 3)}')
    if [[ -z "$TOKEN" ]]; then
      echo "Could not get API auth token from $JSS_URL"
      # If $3 is a usable username, delete this and the next 2 lines
      echo "Perhaps '$3' might be the right username? Exiting to show failure."
      exit 1
      ASSIGNED_USERNAME=$3
   fi
fi
ASSIGNED_USERNAME=$(curl "$JSS_URL/uapi/v1/computers-inventory?section=USER_AND_LOCATION&filter=hardware.serialNumber==$SERIAL" -H "Accept: application/json" -H "Authorization: Bearer $TOKEN" 2>/dev/null | awk '/username/{print $3}' | tr -d '",')
if [[ -z "$ASSIGNED_USERNAME" ]]; then
    echo "Could not get username from computers-inventory for device with serial $SERIAL"
    # If $3 is a usable username, delete this and the next 2 lines
    echo "Perhaps '$3' might be the right username? Exiting to show failure."
    exit 1
    ASSIGNED_USERNAME=$3
fi
echo "Found user '$ASSIGNED_USERNAME' for device with serial $SERIAL"
fi

echo "Writing username/password entries..."
defaults write com.cyberhound.RoamSafe.RoamSafeAppProxy secret-mdm-username "$ASSIGNED_USERNAME"
defaults write com.cyberhound.RoamSafe.RoamSafeAppProxy secret-mdm-shared-secret "$5"

echo "Agent setup completed successfully!"
Jamf Configuration
In the Options tab, set the following Parameter Labels
Setting |
Value |
|---|---|
| Parameter 4 | Service ID |
| Parameter 5 | Shared Secret |
| Parameter 6 | Jamf API Username (Optional) |
| Parameter 7 | Jamf API Password (Optional) |
The Jamf API Username and Password Parameters are usable to lookup the computers-inventory for the user assigned during enrollment. If these are not present, the user doing the enrollment is assumed to be the user assigned to the machine.
RoamSafe Agent Download
To download the RoamSafe Agent for macOS navigate to;
- RoamSafe > Agents > masOS Agents
- Click the button to download the PKG installer for either the latest version or the configured automatic update version can be downloaded
You may also download the uninstall scripts to allow the removal of the RoamSafe agent for macOS.
API User
Create a new Jamf Pro User Account with a Custom Privilege Set. Under Privileges > Jamf Pro Server Objects, give this user Read permissions for Computers. No other Privileges should be needed.
Configuration Profiles
Create a new Configuration Profile. Add a "System Extensions" option and configure the following:
Setting |
Description |
|---|---|
| Display Name | RoamSafe |
| System Extension Types | Allowed Team Identifiers |
| Team Identifier | 53AKF5B59G |
Also add a "Content Filter" option and configure the following:
Setting |
Description |
|---|---|
| Filter Name | RoamSafe |
| Identifier | com.cyberhound.RoamSafe |
| Socket Filter | Enable |
| Socket Filter Bundle Identifier | com.cyberhound.RoamSafe.RoamSafePacketFilter |
| Socket Filter Designated Requirement | identifier com.cyberhound.RoamSafe.RoamSafePacketFilter |
| Network Filter Bundle Identifier | com.cyberhound.RoamSafe.RoamSafePacketFilter |
| Network Filter Designated Requirement | identifier com.cyberhound.RoamSafe.RoamSafePacketFilter |
Set the Scope (e.g. All Computers, All Users)
Policies
To create a new policy, complete the following steps:
- Create a new policy
- Configure the triggers (e.g. to install at Enrollment Complete and to re-run policy on failure)
- Add the RoamSafe package
- Add the script created above
- Ensure that the script Priority is set to "Before"
- Set the Service ID to the Service ID of your CyberEdge Appliance
- Configure the shared secret as per your CyberEdge Appliance configuration
- Provide a username & password for a user with Jamf API permissions
Note
It is recommended tp test this process on a few devices before deploying to the entire fleet.
RoamSafe macOS Certificate Deployment
This help article details instructions for deploying a Blockpage certificate via Jamf. These instructions will only work for the RoamSage macOS Agent version 11.2 or above.
## Generating a Certificate ##
If you wish to utilise your own certificate for the Blockpage, you may use the following on a unix-based system to generate a private key and CA in PEM and DER encoding.
#!/bin/bash
cat << 'EOF' > ca.ext
[ req ]
distinguished_name       = req_distinguished_name
extensions               = v3_ca
req_extensions           = v3_ca

[ v3_ca ]
basicConstraints         = CA:TRUE

[ req_distinguished_name ]
EOF
Generate private key
openssl genrsa -out ca.key 2048
Create a Certificate Signing Request
openssl req -new -key ca.key -out ca.csr -config ca.ext -subj "/C=AU/O=Superloop Pty Ltd/CN=RoamSafe Root CA"
Produce a Certificate Authority from our CSR
openssl x509 -req -in ca.csr -out ca.cer -days 370 -sha256 -extfile ca.ext -extensions v3_ca -signkey ca.key
Clean up temporary files
rm ca.csr ca.ext
## Certificate Deployment ##
To deploy the certificate, complete the following process:
#!/bin/bash

# Log everything to disk as well as the Jamf console, for debugging
logfile=/var/log/jamf.log;
scriptname="roamsafe-blockpage"
scripttmp="/private/tmp"
# Do complicated output file redirection so `echo` matches the Jamf log format
exec &> >(/usr/bin/awk "{\"date +\\\"%a %b %d %X\\\"\" | getline date; close \"date +\\\"%a %b %d %X\\\"\"; print date, \"`scutil --get ComputerName`\", \"$scriptname\[$$\]:\", \$0}" | /usr/bin/tee -a "$logfile")


cat << 'EOF' > "$scripttmp"/ca.crt
-----BEGIN CERTIFICATE-----
Put your certificate here
-----END CERTIFICATE-----
EOF

echo "Wrote certificate"
md5 "$scripttmp"/ca.crt

cat << 'EOF' > "$scripttmp"/ca.key
-----BEGIN RSA PRIVATE KEY-----
Put your private key here
-----END RSA PRIVATE KEY-----
EOF

echo "Wrote Private Key"
md5 "$scripttmp"/ca.key

for user in /Users/*
do
if [ "$user" = "/Users/Shared" ]; then
    continue
fi
# Target directory on macOS 12
echo "Writing blockpage to $user/Library/Containers/com.cyberhound.RoamSafe"
mkdir -p "$user"/Library/Containers/com.cyberhound.RoamSafe/Data/Library/Application\ Support/cacert/
cp "$scripttmp"/ca.key "$user"/Library/Containers/com.cyberhound.RoamSafe/Data/Library/Application\ Support/cacert/
cp "$scripttmp"/ca.crt "$user"/Library/Containers/com.cyberhound.RoamSafe/Data/Library/Application\ Support/cacert/
/usr/bin/openssl x509 -in "$scripttmp"/ca.crt -outform der -out "$user"/Library/Containers/com.cyberhound.RoamSafe/Data/Library/Application\ Support/cacert/ca.der
# Target directory on macOS 11
echo "Writing blockpage to $user"
mkdir -p "$user"/Library/Application\ Support/cacert/
cp "$scripttmp"/ca.key "$user"/Library/Application\ Support/cacert/
cp "$scripttmp"/ca.crt "$user"/Library/Application\ Support/cacert/
/usr/bin/openssl x509 -in "$scripttmp"/ca.crt -outform der -out "$user"/Library/Application\ Support/cacert/ca.der
done

echo "Cleaning up"
rm "$scripttmp"/ca.crt "$scripttmp"/ca.key
Replace the example text with the PEM encoded Certificate and Private Key generate above.
### Configuration Profiles ###
Create a new Configuration Profile (or edit the existing RoamSafe policy). Add a "Certificate" option and configure the following:
Setting |
Description |
|---|---|
| Certificate Name | RoamSafe Block CA |
| Select Certificate Option | Upload (and upload ca.cer created before) |
| Password | Leave Blank |
| Allow all apps access | Ticked |
| Allow export from keychain | Unticked |
Set the Scope (e.g. All Computers, All Users)
Policies
- Create a new policy (or edit the existing RoamSafe deployment policy)
- Add the script created above
- Ensure that the script Priority is set to "Before"